Configure cross-tenant customer-managed keys for an existing storage account
Azure Storage encrypts all data in a storage account at rest. By default, data is encrypted with Microsoft-managed keys. For additional control over encryption keys, you can manage your own keys. Customer-managed keys must be stored in an Azure Key Vault or in an Azure Key Vault Managed Hardware Sec
21 Apr 2026, 03:10 UTC
Azure Storage encrypts all data in a storage account at rest. By default, data is encrypted with Microsoft-managed keys. For additional control over encryption keys, you can manage your own keys. Customer-managed keys must be stored in an Azure Key Vault or in an Azure Key Vault Managed Hardware Security Model (HSM).
This article shows how to configure encryption with customer-managed keys for an existing storage account. In the cross-tenant scenario, the storage account resides in a tenant managed by an ISV, while the key used for encryption of that storage account resides in a key vault in a tenant that is managed by the customer.
To learn how to configure customer-managed keys for a new storage account, see Configure cross-tenant customer-managed keys for a new storage account.
Note
Azure Key Vault and Azure Key Vault Managed HSM support the same APIs and management interfaces for configuration of customer-managed keys. Any action that is supported for Azure Key Vault is also supported for Azure Key Vault Managed HSM.
About cross-tenant customer-managed keys
Many service providers building Software as a Service (SaaS) offerings on Azure want to offer their customers the option to manage their own encryption keys. Customer-managed keys allow a service provider to encrypt the customer's data using an encryption key that is managed by the service provider's customer and that isn't accessible to the service provider. In Azure, the service provider's customer can use Azure Key Vault to manage their encryption keys in their own Microsoft Entra tenant and subscription.
Azure platform services and resources that are owned by the service provider and that reside in the service provider's tenant require access to the key from the customer's tenant to perform the encryption/decryption operations.
The image below shows a data encryption at rest with federated identity in a cross-tenant customer-managed key workflow spanning a service provider and its customer.
Open diagram: Screenshot showing a cross-tenant customer-managed key with a federated identity.
In the example above, there are two Microsoft Entra tenants: an independent service provider's tenant (Tenant 1), and a customer's tenant (Tenant 2). Tenant 1 hosts Azure platform services and Tenant 2 hosts the customer's key vault.
A multitenant application registration is created by the service provider in Tenant 1. A federated identity credential is created on this application using a user-assigned managed identity. Then, the name and application ID of the app is shared with the customer.
A user with the appropriate permissions installs the service provider's application in the customer tenant, Tenant 2. A user then grants the service principal associated with the installed application access to the customer's key vault. The customer also stores the encryption key, or customer-managed key, in the key vault. The customer shares the key location (the URL of the key) with the service provider.
The service provider now has:
- An application ID for a multitenant application installed in the customer's tenant, which has been granted access to the customer-managed key.
- A managed identity configured as the credential on the multitenant application.
- The location of the key in the customer's key vault.
With these three parameters, the service provider provisions Azure resources in Tenant 1 that can be encrypted with the customer-managed key in Tenant 2.
Let's divide the above end-to-end solution into three phases:
- The service provider configures identities.
- The customer grants the service provider's multitenant app access to an encryption key in Azure Key Vault.
- The service provider encrypts data in an Azure resource using the customer-managed key.
Operations in Phase 1 would be a one-time setup for most service provider applications. Operations in Phases 2 and 3 would repeat for each customer.
Phase 1 - The service provider configures a Microsoft Entra application
| Step | Description | Minimum role in Azure RBAC | Minimum role in Microsoft Entra RBAC |
|---|---|---|---|
| 1. | Create a new multitenant Microsoft Entra application registration or start with an existing application registration. Note the application ID (client ID) of the application registration using Azure portal, Microsoft Graph API, Azure PowerShell, or Azure CLI | None | Application Developer |
| 2. | Create a user-assigned managed identity (to be used as a Federated Identity Credential). Azure portal / Azure CLI / Azure PowerShell/ Azure Resource Manager Templates |
Managed identity contributor | None |
| 3. | Configure user-assigned managed identity as a federated identity credential on the application, so that it can impersonate the identity of the application. Graph API reference/ Azure portal/ Azure CLI/ Azure PowerShell |
None | Owner of the application |
| 4. | Share the application name and application ID with the customer, so that they can install and authorize the application. | None | None |
Considerations for service providers
- Azure Resource Manager (ARM) templates aren't recommended for creating Microsoft Entra applications.
- The same multitenant application can be used to access keys in any number of tenants, like Tenant 2, Tenant 3, Tenant 4, and so on. In each tenant, an independent instance of the application is created that has the same application ID but a different object ID. Each instance of this application is thus authorized independently. Consider how the application object used for this feature is used to partition your application across all customers.
- Application can have a maximum of 20 federated identity credentials, which requires a service provider to share federated identities among its customers. For more information about federated identities design considerations and restrictions, see Configure an app to trust an external identity provider
- In rare scenarios, a service provider might use a single Application object per its customer, but that requires significant maintenance costs to manage applications at scale across all customers.
- In the service provider tenant, it isn't possible to automate the Publisher Verification.
Phase 2 - The customer authorizes access to the key vault
| Step | Description | Least privileged Azure RBAC roles | Least privileged Microsoft Entra roles |
|---|---|---|---|
| 1. | None | Users with permissions to install applications | |
| 2. | Create an Azure Key Vault and a key used as the customer-managed key. | A user must be assigned the Key Vault Contributor role to create the key vault A user must be assigned the Key Vault Crypto Officer role to add a key to the key vault |
None |
| 3. | Grant the consented application identity access to the Azure key vault by assigning the role Key Vault Crypto Service Encryption User | To assign the Key Vault Crypto Service Encryption User role to the application, you must have been assigned the User Access Administrator role. | None |
| 4. | Copy the key vault URL and key name into the customer-managed keys configuration of the SaaS offering. | None | None |
Note
To authorize access to the Managed HSM for encryption using customer-managed keys, see example for Storage Account here. For more information about managing keys with Managed HSM, see Manage a Managed HSM using the Azure CLI
Considerations for customers of service providers
- In the customer tenant, Tenant 2, an admin can set policies to block non-admin users from installing applications. These policies can prevent non-admin users from creating service principals. If such a policy is configured, then users with permissions to create service principals need to be involved.
- Access to Azure Key Vault can be authorized using Azure RBAC or access policies. When granting access to a key vault, make sure to use the active mechanism for your key vault.
- A Microsoft Entra application registration has an application ID (client ID). When the application is installed in your tenant, a service principal is created. The service principal shares the same application ID as the app registration, but generates its own object ID. When you authorize the application to have access to resources, you might need to use the service principal
NameorObjectIDproperty.
Phase 3 - The service provider encrypts data in an Azure resource using the customer-managed key
After phases 1 and 2 are complete, the service provider can configure encryption on the Azure resource with the key and key vault in the customer's tenant and the Azure resource in the ISV's tenant. The service provider can configure cross-tenant customer-managed keys with the client tools supported by that Azure resource, with an ARM template, or with the REST API.
Configure cross-tenant customer-managed keys
This section describes how to configure a cross-tenant customer-managed key and encrypt customer data. You learn how to encrypt customer data in a resource in Tenant1 using a customer-managed key stored in a key vault in Tenant2. You can use the Azure portal, Azure PowerShell, or Azure CLI.
Sign in to the Azure portal and follow these steps.
The service provider configures identities
The following steps are performed by the service provider in the service provider's tenant Tenant1.
The service provider creates a new multi-tenant app registration
You can either create a new multi-tenant Microsoft Entra application registration or start with an existing multi-tenant application registration. If starting with an existing application registration, note the application ID (client ID) of the application.
To create a new registration:
Search for Microsoft Entra ID in the search box. Locate and select the Microsoft Entra ID extension.
Select Manage > App registrations from the left pane.
Select + New registration.
Provide the name for the application registration and select Account in any organizational directory (Any Microsoft Entra directory – Multitenant).
Select Register.
Note the ApplicationId/ClientId of the application.
Open diagram: Screen shot showing how to create a new multi-tenant application registration.
The service provider creates a user-assigned managed identity
Create a user-assigned managed identity to be used as a federated identity credential.
Search for Managed Identities in the search box. Locate and select the Managed Identities extension.
Select + Create.
Provide the resource group, region, and name for the managed identity.
Select Review + create.
On successful deployment, note the Azure ResourceId of the user-assigned managed identity, which is available under Properties. For example:
/subscriptions/tttttttt-0000-tttt-0000-tttt0000tttt/resourcegroups/XTCMKDemo/providers/Microsoft.ManagedIdentity/userAssignedIdentities/ConsotoCMKDemoUAOpen diagram: Screen shot showing how to create a resource group and a user-assigned managed identity.
The service provider configures the user-assigned managed identity as a federated credential on the application
Configure a user-assigned managed identity as a federated identity credential on the application, so that it can impersonate the identity of the application.
Navigate to Microsoft Entra ID > App registrations > your application.
Select Certificates & secrets.
Select Federated credentials.
Open diagram: Screen shot showing how to navigate to Certificate and secrets.
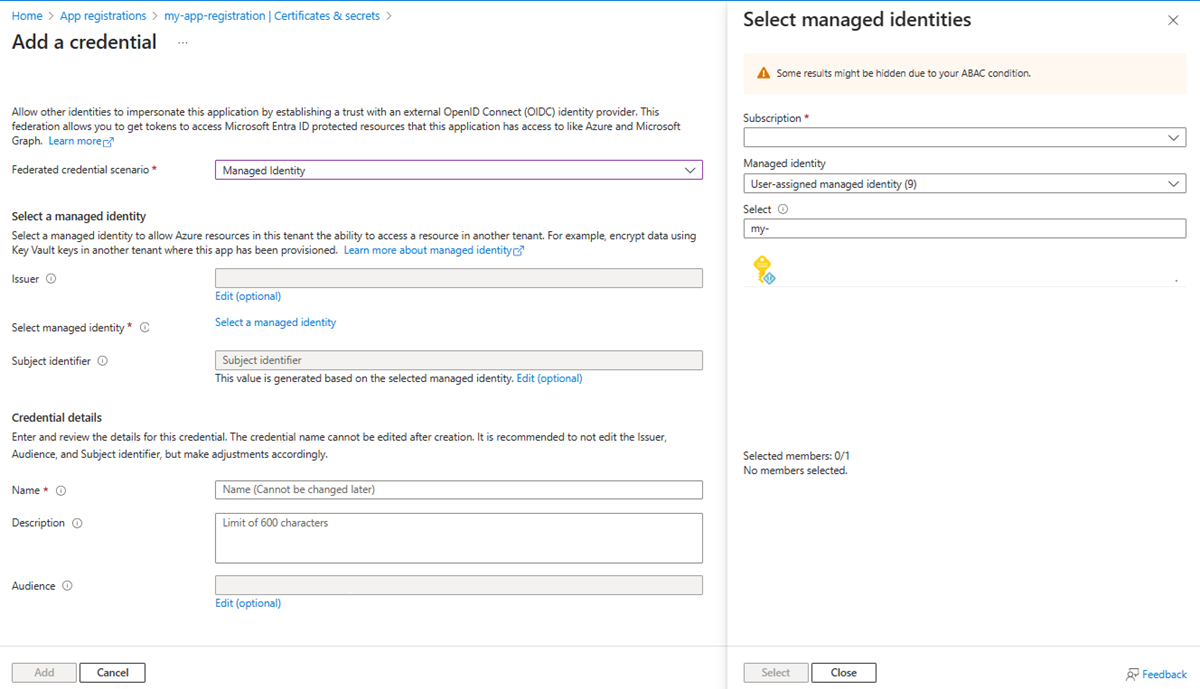
Select + Add credential.
Under Federated credential scenario, select Managed Identity.
Click Select a managed identity. From the pane, select the subscription. Under Managed identity, select User-assigned managed identity. In the Select box, search for the managed identity you created earlier, then click Select at the bottom of the pane.
Open diagram: Screen shot showing how to select a managed identity.
Under Credential details, provide a name and optional description for the credential and select Add.
To use Azure PowerShell to configure the ISV's tenant, install the latest Az module. For more information about installing PowerShell, see Install Azure PowerShell on Windows with PowerShellGet.
- If you choose to use Azure PowerShell locally:
- Install the latest version of the Az PowerShell module.
- Connect to your Azure account using the Connect-AzAccount cmdlet.
- If you choose to use Azure Cloud Shell:
- See Overview of Azure Cloud Shell for more information.
The service provider configures identities
The following steps are performed by the service provider (ISV) in the service provider's tenant, Tenant1.
The service provider signs into Azure
In Azure PowerShell, sign in to the ISV's tenant and set the active subscription to the ISV's subscription.
$isvTenantId="<isv-tenant-id>"
$isvSubscriptionId="<isv-subscription-id>"

# Sign in to Azure in the ISV's tenant.
Connect-AzAccount -Tenant $isvTenantId
# Set the context to the ISV's subscription.
Set-AzContext -Subscription $isvSubscriptionId
The service provider creates a new multi-tenant app registration
Pick a name for your multi-tenant registered application in Tenant1, and create the multi-tenant application in the Azure portal.
The name that you provide for the multi-tenant application is used by the customer to identify the application in Tenant2. Note the app's object ID and application ID. You'll need these values in subsequent steps.
$multiTenantAppName="<multi-tenant-app>"
$multiTenantApp = New-AzADApplication -DisplayName $multiTenantAppName `
    -SignInAudience AzureADMultipleOrgs

# Object ID for the new multi-tenant app
$objectId = $multiTenantApp.Id
# Application (client) ID for the multi-tenant app
$multiTenantAppObjectId = $multiTenantApp.AppId
The service provider creates a user-assigned managed identity
Sign in to the ISV's tenant, and then create a user-assigned managed identity to be used as a federated identity credential. To create a new user-assigned managed identity, you must be assigned a role that includes the Microsoft.ManagedIdentity/userAssignedIdentities/write action.
$isvRgName="<isv-resource-group>"
$isvLocation="<location>"
$userIdentityName="<user-assigned-managed-identity>"

# Create a new resource group in the ISV's subscription.
New-AzResourceGroup -Location $isvLocation -ResourceGroupName $isvRgName

# Create the new user-assigned managed identity.
$userIdentity = New-AzUserAssignedIdentity -Name $userIdentityName `
    -ResourceGroupName $isvRgName `
    -Location $isvLocation `
    -SubscriptionId $isvSubscriptionId
The service provider configures the user-assigned managed identity as a federated credential on the application
Configure a user-assigned managed identity as a federated identity credential on the application, so that it can impersonate the identity of the application.
To configure the federated identity credential from PowerShell, first install version 6.3.0 or later of the Az.Resources module.
New-AzADAppFederatedCredential -ApplicationObjectId $multiTenantApp.Id `
    -Name "MyFederatedIdentityCredential" `
    -Audience "api://AzureADTokenExchange" `
    -Issuer "https://login.microsoftonline.com/<tenant-id>/v2.0" `
    -Subject $userIdentity.PrincipalId `
    -Description "Federated Identity Credential for a customer-managed key"
Use the Bash environment in Azure Cloud Shell. For more information, see Get started with Azure Cloud Shell.
If you prefer to run CLI reference commands locally, install the Azure CLI. If you're running on Windows or macOS, consider running Azure CLI in a Docker container. For more information, see How to run the Azure CLI in a Docker container.
If you're using a local installation, sign in to the Azure CLI by using the az login command. To finish the authentication process, follow the steps displayed in your terminal. For other sign-in options, see Authenticate to Azure using Azure CLI.
When you're prompted, install the Azure CLI extension on first use. For more information about extensions, see Use and manage extensions with the Azure CLI.
Run az version to find the version and dependent libraries that are installed. To upgrade to the latest version, run az upgrade.
The service provider configures identities
The following steps are performed by the service provider in the service provider's tenant Tenant1.
The service provider signs in to Azure
Sign in to Azure to use Azure CLI.
az login
The service provider creates a new multi-tenant app registration
Pick a name for your multi-tenant application in Tenant1, and create the multi-tenant application in the Azure portal.
The name that you provide for the multi-tenant application is used by the customer to identify the application in Tenant2. Copy the application ID (or client ID) of the app, the object ID of the app, and also the tenant ID for the app. You'll need these values in the following steps.
multiTenantAppName="<multi-tenant-app>"
multiTenantAppObjectId=$(az ad app create --display-name $multiTenantAppName \
    --sign-in-audience AzureADMultipleOrgs \
    --query id \
    --output tsv)

multiTenantAppId=$(az ad app show --id $multiTenantAppObjectId --query appId --output tsv)
The service provider creates a user-assigned managed identity
Sign in to the ISV's tenant, and then create a user-assigned managed identity to be used as a federated identity credential. To create a new user-assigned managed identity, you must be assigned a role that includes the Microsoft.ManagedIdentity/userAssignedIdentities/write action.
isvSubscriptionId="<isv-subscription-id>"
isvRgName="<isv-resource-group>"
isvLocation="<location>"
userIdentityName="<user-assigned-managed-identity>"

az group create --location $isvLocation \
    --resource-group $isvRgName \
    --subscription $isvSubscriptionId

principalId=$(az identity create --name $userIdentityName \
    --resource-group $isvRgName \
    --location $isvLocation \
    --subscription $isvSubscriptionId \
    --query principalId \
    --out tsv)
The service provider configures the user-assigned managed identity as a federated credential on the application
Run the az ad app federated-credential create method to configure a federated identity credential on an app and create a trust relationship with an external identity provider.
Use api://AzureADTokenExchange as the audience value in the federated identity credential. See the API reference for more details.
# Create a file named "credential.json" with the following content.
# Replace placeholders in angle brackets with your own values.
{
    "name": "MyFederatedIdentityCredential",
    "issuer": "https://login.microsoftonline.com/<tenantID>/v2.0",
    "subject": "<user-assigned-identity-principal-id>",
    "description": "Federated Identity Credential for a customer-managed key",
    "audiences": [
        "api://AzureADTokenExchange"
    ]
}

az ad app federated-credential create --id $multiTenantAppObjectId --parameters credential.json
The service provider shares the application ID with the customer
Find the application ID (client ID) of the multi-tenant application and share it with the customer.
The customer grants the service provider's app access to the key in the key vault
The following steps are performed by the customer in the customer's tenant Tenant2. The customer can use the Azure portal, Azure PowerShell, or Azure CLI.
The user executing the steps must be an administrator with a privileged role such as Application Administrator, Cloud Application Administrator, or Global Administrator.
Sign in to the Azure portal and follow these steps.
The customer installs the service provider application in the customer tenant
To install the service provider's registered application in the customer's tenant, you create a service principal with the application ID from the registered app. You can create the service principal in either of the following ways:
- Use Microsoft Graph, Microsoft Graph PowerShell, Azure PowerShell, or Azure CLI to manually create the service principal.
- Construct an admin-consent URL and grant tenant-wide consent to create the service principal. You'll need to provide them with your AppId.
The customer creates a key vault
To create the key vault, the user's account must be assigned the Key Vault Contributor role or another role that permits creation of a key vault.
From the Azure portal menu, or from the Home page, select + Create a resource. In the Search box, enter Key vaults. From the results list, select Key vaults. On the Key vaults page, select Create.
On the Basics tab, choose a subscription. Under Resource group, select Create new and enter a resource group name.
Enter a unique name for the key vault.
Select a region and pricing tier.
Enable purge protection for the new key vault.
On the Access policy tab, select Azure role-based access control for Permission model.
Select Review + create and then Create.
Open diagram: Screen shot showing how to create a key vault.
Take note of the key vault name and URI Applications that access your key vault must use this URI.
For more information, see Quickstart - Create an Azure Key Vault with the Azure portal.
The customer assigns Key Vault Crypto Officer role to a user account
This step ensures that you can create encryption keys.
- Navigate to your key vault and select Access Control (IAM) from the left pane.
- Under Grant access to this resource, select Add role assignment.
- Search for and select Key Vault Crypto Officer.
- Under Members, select User, group, or service principal.
- Select Members and search for your user account.
- Select Review + Assign.
The customer creates an encryption key
To create the encryption key, the user's account must be assigned the Key Vault Crypto Officer role or another role that permits creation of a key.
- On the Key Vault properties page, select Keys.
- Select Generate/Import.
- On the Create a key screen, specify a name for the key. Leave the other values to their defaults.
- Select Create.
- Copy the key URI.
The customer grants the service provider application access to the key vault
Assign the Azure RBAC role Key Vault Crypto Service Encryption User to the service provider's registered application so that it can access the key vault.
- Navigate to your key vault and select Access Control (IAM) from the left pane.
- Under Grant access to this resource, select Add role assignment.
- Search for and select Key Vault Crypto Service Encryption User.
- Under Members, select User, group, or service principal.
- Select Members and search for the application name of the application you installed from the service provider.
- Select Review + Assign.
Now you can configure customer-managed keys with the key vault URI and key.
To use Azure PowerShell to configure the client's tenant, install the latest Az module. For more information about installing PowerShell, see Install Azure PowerShell on Windows with PowerShellGet.
- If you choose to use Azure PowerShell locally:
- Install the latest version of the Az PowerShell module.
- Connect to your Azure account using the Connect-AzAccount cmdlet.
- If you choose to use Azure Cloud Shell:
- See Overview of Azure Cloud Shell for more information.
The customer signs into Azure
In Azure PowerShell, sign in to the customer's tenant and set the active subscription to the customer's subscription.
$customerTenantId="<customer-tenant-id>"
$customerSubscriptionId="<customer-subscription-id>"

# Sign in to Azure in the customer's tenant.
Connect-AzAccount -Tenant $customerTenantId
# Set the context to the customer's subscription.
Set-AzContext -Subscription $customerSubscriptionId
The customer installs the service provider application in the customer tenant
Once you receive the application ID of the service provider's multi-tenant application, install the application in your tenant, Tenant2, by creating a service principal.
Execute the following commands in the tenant where you plan to create the key vault.
$customerRgName="<customer-resource-group>"
$customerLocation="<location>"
$multiTenantAppId="<multi-tenant-app-id>" # appId value from Tenant1

# Create a resource group in the customer's subscription.
New-AzResourceGroup -Location $customerLocation -ResourceGroupName $customerRgName

# Create the service principal with the registered app's application ID (client ID).
$servicePrincipal = New-AzADServicePrincipal -ApplicationId $multiTenantAppId
The customer creates a key vault
To create the key vault, the customer's account must be assigned the Key Vault Contributor role or another role that permits creation of a key vault.
$kvName="<key-vault>"

$kv = New-AzKeyVault -Location $customerLocation `
    -Name $kvName `
    -ResourceGroupName $customerRgName `
    -SubscriptionId $customerSubscriptionId `
    -EnablePurgeProtection `
    -EnableRbacAuthorization
The customer assigns Key Vault Crypto Officer role to a user account
Assign the Key Vault Crypto Officer role to a user account. This step ensures that the user can create the key vault and encryption keys. The example below assigns the role to the current signed-in user.
$currentUserObjectId = (Get-AzADUser -SignedIn).Id

New-AzRoleAssignment -RoleDefinitionName "Key Vault Crypto Officer" `
    -Scope $kv.ResourceId `
    -ObjectId $currentUserObjectId
The customer creates an encryption key
To create the encryption key, the user's account must be assigned the Key Vault Crypto Officer role or another role that permits creation of a key.
$keyName="<key-name>"

Add-AzKeyVaultKey -Name $keyName `
    -VaultName $kvName `
    -Destination software
The customer grants the service provider application access to the key vault
Assign the Azure RBAC role Key Vault Crypto Service Encryption User to the service provider's registered application, via the service principal that you created earlier, so that it can access the key vault.
New-AzRoleAssignment -RoleDefinitionName "Key Vault Crypto Service Encryption User" `
    -Scope $kv.ResourceId `
    -ObjectId $servicePrincipal.Id
Now you can configure customer-managed keys with the key vault URI and key.
Use the Bash environment in Azure Cloud Shell. For more information, see Get started with Azure Cloud Shell.
If you prefer to run CLI reference commands locally, install the Azure CLI. If you're running on Windows or macOS, consider running Azure CLI in a Docker container. For more information, see How to run the Azure CLI in a Docker container.
If you're using a local installation, sign in to the Azure CLI by using the az login command. To finish the authentication process, follow the steps displayed in your terminal. For other sign-in options, see Authenticate to Azure using Azure CLI.
When you're prompted, install the Azure CLI extension on first use. For more information about extensions, see Use and manage extensions with the Azure CLI.
Run az version to find the version and dependent libraries that are installed. To upgrade to the latest version, run az upgrade.
The customer signs in to Azure
Sign in to Azure to use Azure CLI.
az login
The customer installs the service provider application in the customer tenant
Once you receive the application ID of the service provider's multi-tenant application, install the application in your tenant Tenant2 using the following command. Installing the application creates a service principal in your tenant.
Execute the following commands in the tenant where you plan to create the key vault.
# Create the service principal with the registered app's application ID (client ID)
multiTenantAppId="<multi-tenant-app-id>"
az ad sp create --id $multiTenantAppId --query id --out tsv
The customer creates a key vault
To create the key vault, the customer's account must be assigned the Key Vault Contributor role or another role that permits creation of a key vault.
customerSubscriptionId="<customer-subscription-id>"
customerRgName="<customer-resource-group>"
customerLocation="<location>"
kvName="<key-vault>"

az group create --location $customerLocation \
    --name $customerRgName

az keyvault create --name $kvName \
    --location $customerLocation \
    --resource-group $customerRgName \
    --subscription $customerSubscriptionId \
    --enable-purge-protection true \
    --enable-rbac-authorization true
The customer assigns Key Vault Crypto Officer role to a user account
This step ensures that you can create the key vault and encryption keys.
currentUserObjectId=$(az ad signed-in-user show --query id --output tsv)

kvResourceId=$(az keyvault show --resource-group $customerRgName \
    --name $kvName \
    --query id \
    --output tsv)

az role assignment create --role "Key Vault Crypto Officer" \
    --scope $kvResourceId \
    --assignee-object-id $currentUserObjectId
The customer creates an encryption key
To create the encryption key, the user's account must be assigned the Key Vault Crypto Officer role or another role that permits creation of a key.
keyName="<key-name>"
az keyvault key create --name $keyName --vault-name $kvName
The customer grants the service provider application access to the key vault
Assign the Azure RBAC role Key Vault Crypto Service Encryption User to the service provider's registered application, via the service principal that you created earlier, so that the registered application can access the key vault.
servicePrincipalId=$(az ad sp show --id $multiTenantAppId --query id --output tsv)

az role assignment create --role "Key Vault Crypto Service Encryption User" \
    --scope $kvResourceId \
    --assignee-object-id $servicePrincipalId
Now you can configure customer-managed keys with the key vault URI and key.
Configure customer-managed keys for an existing account
Up to this point, you've configured the multi-tenant application on the ISV's tenant, installed the application on the customer's tenant, and configured the key vault and key on the customer's tenant. Next you can configure customer-managed keys on an existing storage account with the key from the customer's tenant.
The examples in this article show how to configure customer-managed keys on an existing storage account by using a user-assigned managed identity to authorize access to the key vault. You can also use a system-assigned managed identity to configure customer-managed keys on an existing storage account. In either case, the managed identity must have appropriate permissions to access the key vault. For more information, see Authenticate to Azure Key Vault.
When you configure encryption with customer-managed keys for an existing storage account, you can choose to automatically update the key version used for Azure Storage encryption whenever a new version is available in the associated key vault. To do so, omit the key version from the key URI. Alternately, you can explicitly specify a key version to be used for encryption until the key version is manually updated. Including the key version on the key URI configures customer-managed keys for manual updating of the key version.
Important
To rotate a key, create a new version of the key in Azure Key Vault. Azure Storage does not handle key rotation, so you will need to manage rotation of the key in the key vault. You can configure key auto-rotation in Azure Key Vault or rotate your key manually.
Azure Storage checks the key vault for a new key version only once daily. When you rotate a key in Azure Key Vault, be sure to wait 24 hours before disabling the older version.
To configure cross-tenant customer-managed keys for an existing storage account in the Azure portal, follow these steps:
Navigate to your storage account.
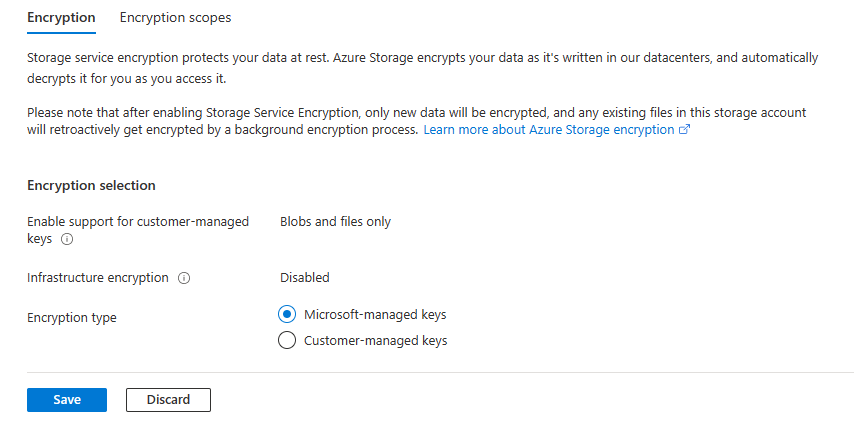
On the Under Security + networking, select Encryption. By default, key management is set to Microsoft-managed keys, as shown in the following image.
Open diagram: Screenshot showing encryption options in Azure portal.
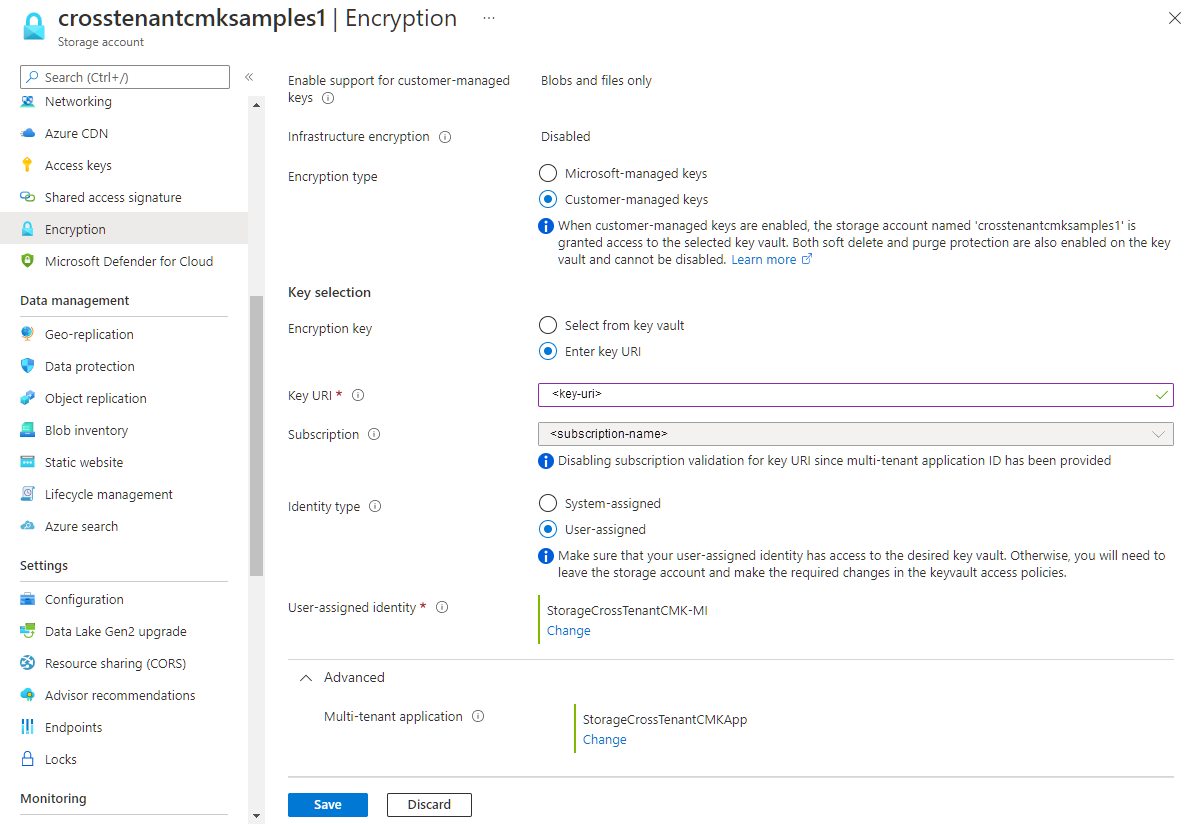
Select the Customer-managed keys option.
Choose the Select from Key Vault option.
Select Enter key URI, and specify the key URI. Omit the key version from the URI if you want Azure Storage to automatically check for a new key version and update it.
Select the subscription that contains the key vault and key.
In the Identity type field, select User-assigned, then specify the managed identity with the federated identity credential that you created previously.
Expand the Advanced section, and select the multi-tenant registered application that you previously created in the ISV's tenant.
Save your changes.
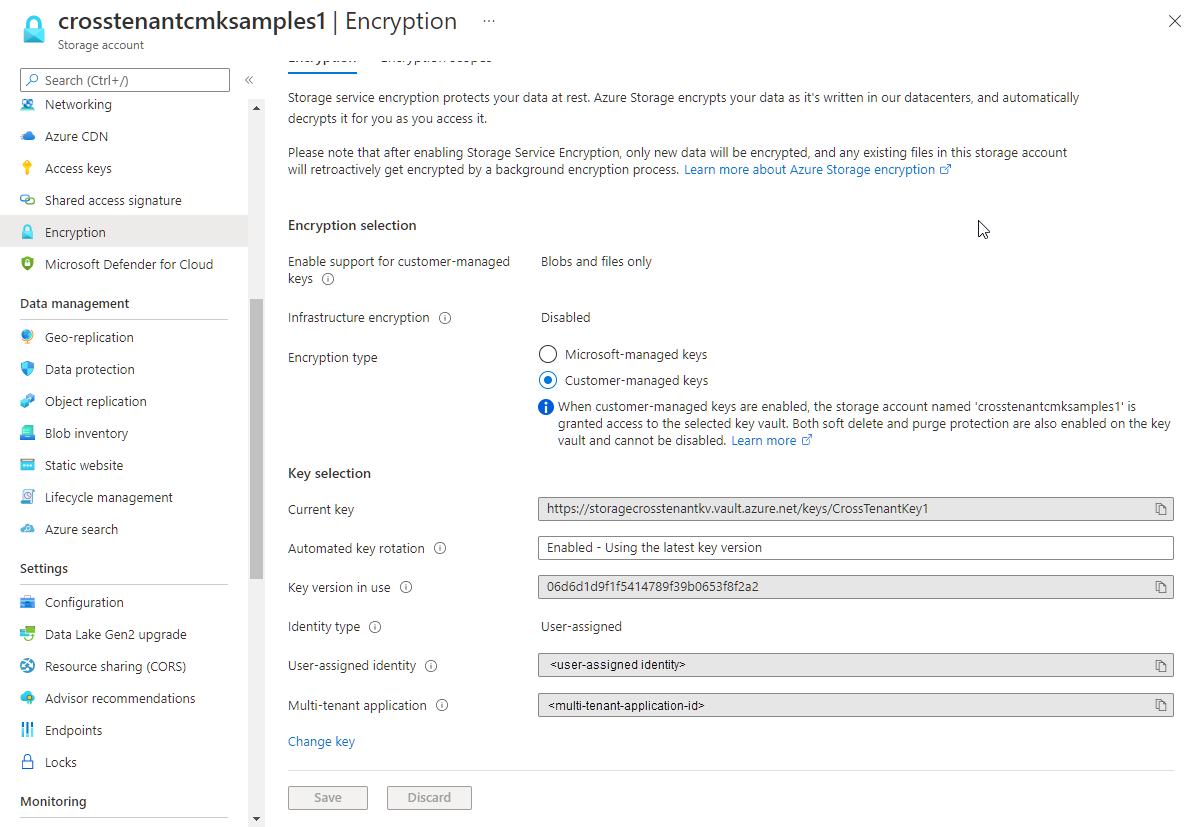
After you've specified the key from the key vault in the customer's tenant, the Azure portal indicates that customer-managed keys are configured with that key. It also indicates that automatic updating of the key version is enabled, and displays the key version currently in use for encryption. The portal also displays the type of managed identity used to authorize access to the key vault, the principal ID for the managed identity, and the application ID of the multi-tenant application.
Open diagram: Screenshot showing cross-tenant customer-managed key configuration.
To configure cross-tenant customer-managed keys for a new storage account with PowerShell, first install the Az.Storage PowerShell module, version 5.1.0 or later. This module is installed with the Az PowerShell module, version 9.1.0 or later.
Next, call Set-AzStorageAccount, providing the resource ID for the user-assigned managed identity that you configured previously in the ISV's subscription, and the application (client) ID for the multi-tenant application that you configured previously in the ISV's subscription. Provide the key vault URI and key name from the customer's key vault.
Remember to replace the placeholder values in brackets with your own values and to use the variables defined in the previous examples.
$accountName = "<storage-account>"
$kvUri = "<key-vault-uri>"
$keyName = "<key-name>"
$multiTenantAppId = "<multi-tenant-app-id>"

Set-AzStorageAccount -ResourceGroupName $isvRgName `
    -Name $accountName `
    -KeyvaultEncryption `
    -UserAssignedIdentityId $userIdentity.Id `
    -IdentityType SystemAssignedUserAssigned `
    -KeyName $keyName `
    -KeyVaultUri $kvUri `
    -KeyVaultUserAssignedIdentityId $userIdentity.Id `
    -KeyVaultFederatedClientId $multiTenantAppId
To configure cross-tenant customer-managed keys for an existing storage account with Azure CLI, first install the Azure CLI, version 2.42.0 or later. For more information about installing Azure CLI, see How to install the Azure CLI.
Next, call az storage account update, providing the resource ID for the user-assigned managed identity that you configured previously in the ISV's subscription, and the application (client) ID for the multi-tenant application that you configured previously in the ISV's subscription. Provide the key vault URI and key name from the customer's key vault.
Remember to replace the placeholder values in brackets with your own values and to use the variables defined in the previous examples.
accountName="<storage-account>"
kvUri="<key-vault-uri>"
keyName="<key-name>"
multiTenantAppId="<multi-tenant-app-id>" # appId value from multi-tenant app

# Get the resource ID for the user-assigned managed identity.
identityResourceId=$(az identity show --name $userIdentityName \
    --resource-group $isvRgName \
    --query id \
    --output tsv)

az storage account update --name $accountName \
    --resource-group $isvRgName \
    --identity-type SystemAssigned,UserAssigned \
    --user-identity-id $identityResourceId \
    --encryption-key-vault $kvUri \
    --encryption-key-name $keyName \
    --encryption-key-source Microsoft.Keyvault \
    --key-vault-user-identity-id $identityResourceId \
    --key-vault-federated-client-id $multiTenantAppId
Change the key
You can change the key that you are using for Azure Storage encryption at any time.
Note
When you change the key or key version, the protection of the root encryption key changes, but the data in your Azure Storage account remains encrypted at all times. There is no additional action required on your part to ensure that your data is protected. Changing the key or rotating the key version doesn't impact performance. There is no downtime associated with changing the key or rotating the key version.
To change the key with the Azure portal, follow these steps:
- Navigate to your storage account and display the Encryption settings.
- Select the key vault and choose a new key.
- Save your changes.
To change the key with PowerShell, call Set-AzStorageAccount and provide the new key name and version. If the new key is in a different key vault, then you must also update the key vault URI.
To change the key with Azure CLI, call az storage account update and provide the new key name and version. If the new key is in a different key vault, then you must also update the key vault URI.
Revoke access to a storage account that uses customer-managed keys
To temporarily revoke access to a storage account that is using customer-managed keys, disable the key currently being used in the key vault. There is no performance impact or downtime associated with disabling and reenabling the key.
After the key has been disabled, clients can't call operations that read from or write to a blob or its metadata. For information about which operations will fail, see Revoke access to a storage account that uses customer-managed keys.
Caution
When you disable the key in the key vault, the data in your Azure Storage account remains encrypted, but it becomes inaccessible until you reenable the key.
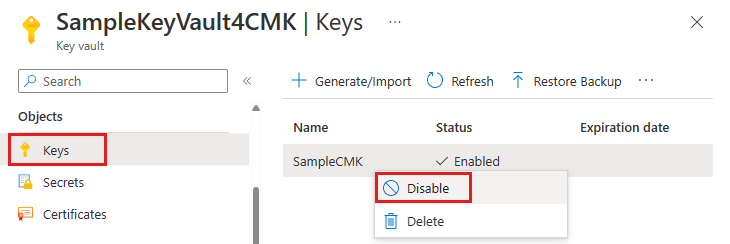
To disable a customer-managed key with the Azure portal, follow these steps:
Navigate to the key vault that contains the key.
Under Objects, select Keys.
Right-click the key and select Disable.
Open diagram: Screenshot showing how to disable a customer-managed key in the key vault.
To revoke a customer-managed key with PowerShell, call the Update-AzKeyVaultKey command, as shown in the following example. Remember to replace the placeholder values in brackets with your own values to define the variables, or use the variables defined in the previous examples.
$kvName  = "<key-vault-name>"
$keyName = "<key-name>"
$enabled = $false
# $false to disable the key / $true to enable it

# Check the current state of the key (before and after enabling/disabling it)
Get-AzKeyVaultKey -Name $keyName -VaultName $kvName

# Disable (or enable) the key
Update-AzKeyVaultKey -VaultName $kvName -Name $keyName -Enable $enabled
To revoke a customer-managed key with Azure CLI, call the az keyvault key set-attributes command, as shown in the following example. Remember to replace the placeholder values in brackets with your own values to define the variables, or use the variables defined in the previous examples.
kvName="<key-vault-name>"
keyName="<key-name>"
enabled="false"
# "false" to disable the key / "true" to enable it:

# Check the current state of the key (before and after enabling/disabling it)
az keyvault key show \
    --vault-name $kvName \
    --name $keyName

# Disable (or enable) the key
az keyvault key set-attributes \
    --vault-name $kvName \
    --name $keyName \
    --enabled $enabled
Switch back to Microsoft-managed keys
You can switch from customer-managed keys back to Microsoft-managed keys at any time, using the Azure portal, PowerShell, or the Azure CLI.
To switch from customer-managed keys back to Microsoft-managed keys in the Azure portal, follow these steps:
Navigate to your storage account.
Under Security + networking, select Encryption.
Change Encryption type to Microsoft-managed keys.
Open diagram: Screenshot showing how to switch to Microsoft-managed keys for a storage account.
To switch from customer-managed keys back to Microsoft-managed keys with PowerShell, call Set-AzStorageAccount with the -StorageEncryption option, as shown in the following example. Remember to replace the placeholder values in brackets with your own values and to use the variables defined in the previous examples.
Set-AzStorageAccount -ResourceGroupName $storageAccount.ResourceGroupName `
    -AccountName $storageAccount.StorageAccountName `
    -StorageEncryption
To switch from customer-managed keys back to Microsoft-managed keys with Azure CLI, call az storage account update and set the --encryption-key-source parameter to Microsoft.Storage, as shown in the following example. Remember to replace the placeholder values in brackets with your own values and to use the variables defined in the previous examples.
az storage account update \
    --name <storage-account> \
    --resource-group <resource_group> \
    --encryption-key-source Microsoft.Storage
 azure
azure