What is Azure App Service?
In 2012, Microsoft added a new portal named Azure Web Sites for customers who wish to execute their web applications on the Azure environment. The backdrop was that it didn’t offer these services for the people who are developing APIs and mobile applications.
Hence, to extend its services to all the developers, Microsoft created Web App and Mobile App. To further expand their features, Microsoft introduced two more services, API and Logic Apps. All these services were labelled under Azure APP Services as a single-family in 2014.
Hence the three services that come under the umbrella of Azure App Services are Web App (Web Application), Mobile Apps (mobile application and backend functionality), and Functions Apps (running codes).
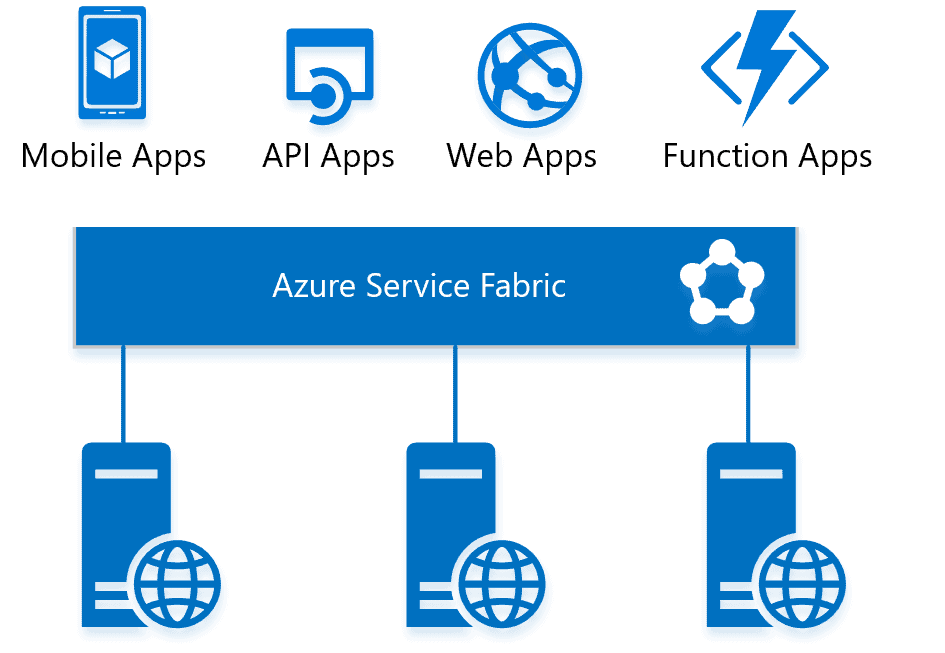
What is Azure Web App?
Azure Web App is the service that helps us in developing the user interactive, multi-functional, secured, scalable, and highly reliable application. It is a platform that helps host web applications by building, deploying, and running applications. Azure Web App comes under Platform-as-a-Service.
But what makes Azure Web App different from the traditional way of web hosting is clearly shown in the picture below:
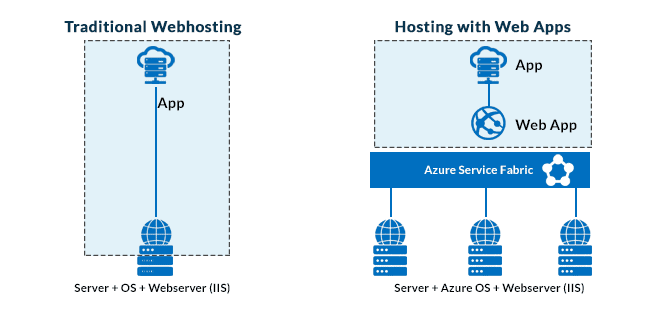
In Azure Web App, we need to migrate our application to the cloud and relax. The family head ‘Azure App Service‘ will look after everything and helps in running the procedure. The most significant advantage of hosting the application on the web is that we don’t need to pay much attention to the infrastructure. Unlike the traditional way, where we need to check for Server capabilities, Operating System updates, and keeps an eye on IIS (Internet Information Services running), Azure Web App does all this on its own.
Web App makes the task easier for us by installing Azure Service Fabric (refer to the above image), responsible for performing all the operations. Azure Service Fabric makes sure that the Web App is provided with all the required resources and allocation. Azure Web App ensures that application updates, configuration management, traffic rules, compliance requirements are fulfilled without the developer on the other hand. Companies can focus more on enhancing the application experience for the customer and provide them with excellent results.
Deployment Slot of Azure Web App
The success of the Web App is due to the deployment slot. One can run different versions of the application simultaneously in the deployment slot. The deployment slot is used to check and verify the application’s performance.
App Services run on the default slot known as the Production slot and contain deployment slots to check the application’s version. Out of all the instances created, one of them will always point to the default slot, and we can attempt swapping different instances with just one click.
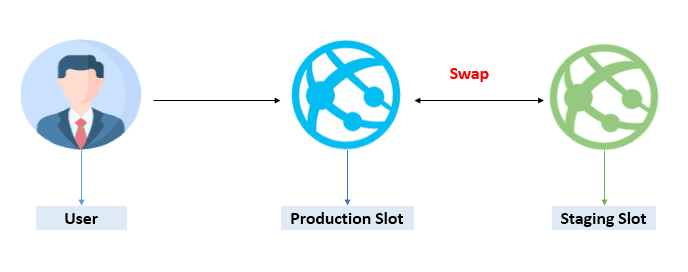
Once the application instance gets verified, it can be swapped with the default production slot, ensuring zero downtime. But anytime you feel the application is not working as expected, swap with a different instance that is functioning well. To test the application usability, it provides an option to shift some traffic to the deployment slot to check the functionality and response from the user.
Why use Azure Web App?
The popularity of the Azure Web App is due to the remarkable features it offers. Below are some features that make the Azure Web App outstanding and compel one to use it.
|
Multilanguage support Azure Web App supports many languages, including Java, Node.js, Ruby, ASP.Net Core, Python, and ASP.NET. |
Docker and Container It helps shift Docker to Web App directly. It also helps in hosting the container of Windows/Linux to App Service. Further, it provides the facility to execute multiple containers with the composition of Docker. |
|
High Availability and Scalability Azure Web App provides 99.9 % availability and conducts automatic scaling of the app. The app can be hosted from any remote data centre. |
DevOps Optimization Web App uses continuous deployment and integration (CI/CD) that help in zero downtime. It also conducts the testing phase for the application through the deployment slot. |
|
Integration with Visual Studio Code and Visual Code The user from the IDE Platform can quickly deploy a web application to the Azure app platform. It allows developers to acquire the full knowledge of application development workflow and conduct a debugging and integration process with ease. |
Compliance and Security It utilises multi-encryption and authentication security procedures. It is also in compliance with PCI, SOC, and ISO for security. We can also restrict the IP addresses and manage the services. |
|
Serverless Code ‘Azure Functions’ is one of the Azure techniques that help in infrastructure updates and provides serverless computation. |
In-Built templates. Azure Web App contains Azure Marketplace, which includes thousands of pre-built templates that are easy to deploy and use. For examples – Joomla, WordPress, and Drupal. |
|
Low maintenance and Cost The web app consists of a load balancer that helps manage infrastructure costs. Azure Web App consists of numerous logs that help solve troubleshooting problems and save money. |
Site Extensions It provides us with various extensions used to monitor, manage and encrypt SSL. Site extension are plug-ins that help perform multiple functions. |
How To Create Azure Web App in Azure Portal.
So after gaining some theoretical knowledge, now let’s try building a Web App in Azure Portal:
To create Azure Web App, you will be required with a subscription plan so ensure that you have the required subscription. (If you have opted for the free account, you will get a FREE TRIAL subscription for one month.)
Note: If you don’t know how to get a free Azure account, click on Azure Free Trial Account to learn more.
Step 1) Log in to Azure Portal.
Step 2) Go to an Azure Portal, log in to your account. The Home page will appear with the option of ‘Create a Resource‘. Click on it to proceed further.

Alternatively, you can create a resource from the hamburger icon on the left top corner of the home page.
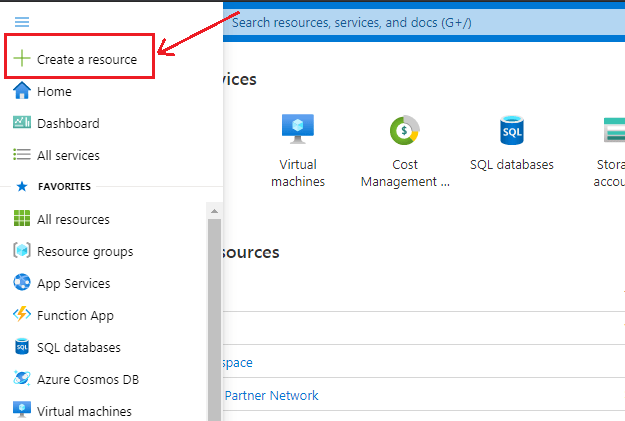
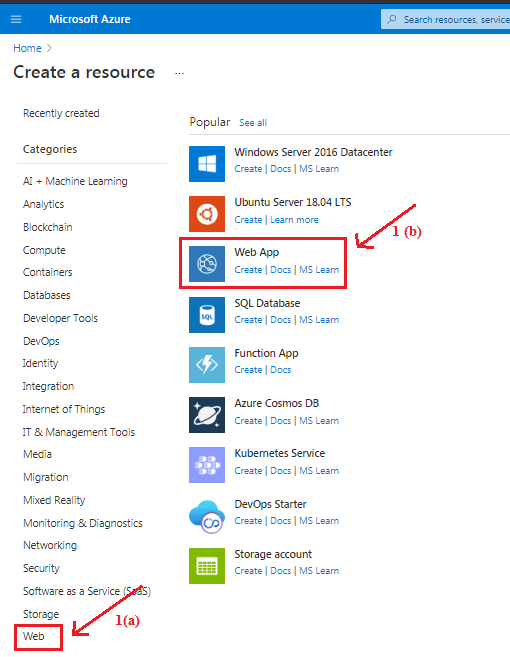
Step 3) Under ‘Create a Resource’, you will see various categories; select Web [1(a) refer to the image below]. You can also find Web App [1(b) refer to the image below] under the Popular section.
Step 4) The following screen will appear with the heading ‘Create Web App‘, where you will be asked to configure the following details:
- Subscription – It specifies the valid subscription plan for the Azure Portal.
- Resource Group – you can create a new resource group here; it will specify (New) in front of the resource group name.
- Name – Specify the name you want to keep for your Web App Instance.
- Publish – It will provide you with two options: Code and the Docker Container.
- Runtime Stack – It specifies the technology through which you deploy the app. We have selected .NET Core 3.1 (LTS) for the demo purpose.
- Operating System – It helps in selecting the hosting platform for the application. Windows and Linux are two options.
- Region – Select the region.
- SKU and Size – It will specify how many apps you can create under this subscription. By default, it shows Standard S1.
Step 5) As soon as we click on Create button, the deployment process gets initiated. The following screen appears when the deployment process gets completed; then click on ‘Go to Resource‘.
Step 6) When we go to the resource we created, we will see that the Web App is created. Refer to the below image to understand better.
Step 7) After that, click on the web app created by you, there you will find a Url; click to reach the next screen.
Step 8) When you click on Url, it will take you to the next screen indicating the created web app. As we haven’t deployed any code, it asks to deploy the code.

0 Comments