Released in October 2021, Windows 11 is the first numbered update to Microsoft’s operating system in more than six years. You would expect there would be dramatic changes between Windows 11 and Windows 10. But there weren’t. To a great extent, Windows 11 looks and works much like its predecessor.
That said, there are quite a few minor differences between the two, and the new OS may take some getting used to. I’m here to help. Whether you’ve upgraded a Windows 10 machine to Windows 11 or you’ve got it on a new PC, this cheat sheet will get you up to speed on it. I’ve also provided quick-reference charts listing useful keyboard shortcuts, touchpad gestures, and touchscreen gestures.
The new Start menu
The biggest change in Windows 11 from Windows 10 is front and center, literally. It’s the Start menu. Instead of being anchored to the left side of the screen, as it was in Windows 10, it hovers just above the bottom center of the screen.
It’s much smaller than the Windows 10 Start menu, and you don’t scroll through it as you do through the Windows 10 Start menu. Instead of large tiles, some of which are “live” tiles that display changing information, you get multiple rows of small application icons. Simply click the application you want to run.
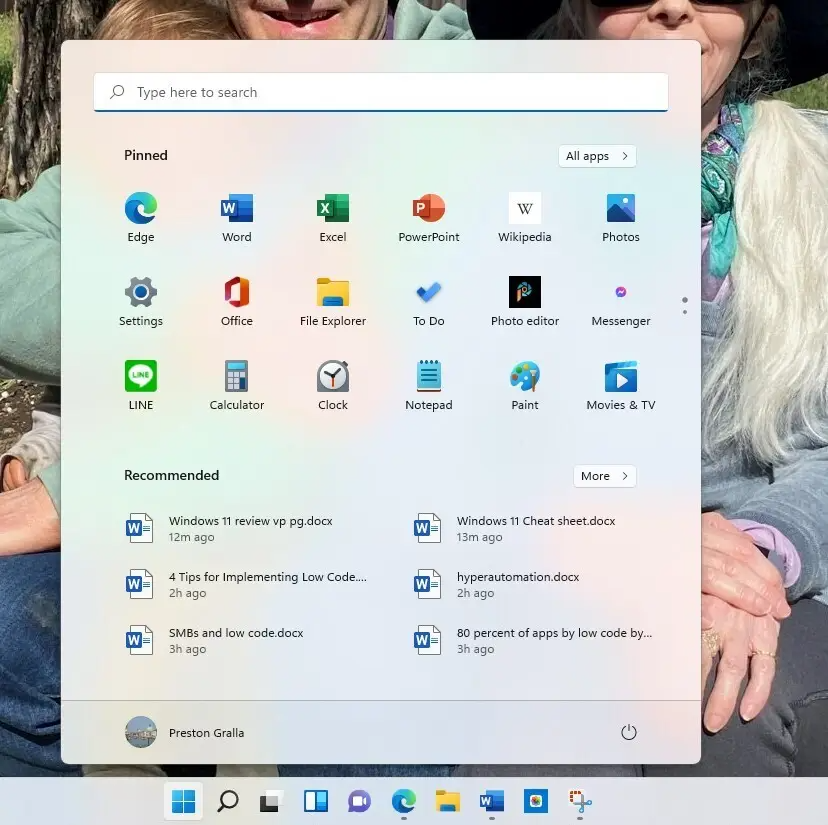
Windows 11 gives you control over how the app icons are organized on the Start menu — just drag and drop any icon to a new location. The applications you see are just some of those on your PC. To see them all, click All apps at the top right of the menu and they’ll appear in a scrollable vertical list.
When you right-click a tile, a menu pops up. Here’s where things get a bit confusing, because not every Windows app and desktop application has the same pop-up menu. Most have some combination of these options:
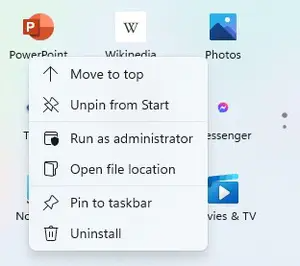
Move to top: Makes the app the left topmost app on the Start menu — the first on the list.
Unpin from Start: Select this and the icon vanishes from the Start menu.
Run as an administrator: This lets you run the app or application as an administrator.
Open file location: Opens File Explorer to the folder where the application lives.
Pin to taskbar: As it says, this pins the app to the taskbar. If it’s already pinned, you’ll get an Unpin from taskbar choice.
App settings: This leads to a screen that lets you change the app’s settings, such as whether to allow it to run in the background or get access to your microphone.
Uninstall: This uninstalls the app. Some Windows apps created by Microsoft, such as Clock, cannot be uninstalled. Over time, however, Windows 10 has let you uninstall more built-in apps than previously. Both Windows 10 and Windows 11 may continue that trend in the future.
Rate and review: This option is available only for apps downloaded from the Microsoft Store. It brings you to a page that lets you rate the app and write a review. The rating and review appear in the app’s description in the Microsoft Store.
Share: This lets you share a link to the app using a variety of methods, such as Mail, Twitter, and others.
Some Windows apps have other choices as well, depending on their purposes. For example, right-click File Explorer and you get choices such as mapping or unmapping a network drive.
When you click the All apps icon to display your applications in a scrollable list, you can right-click any app icon to see some combination of these choices. On the menu you’ll also see a list of files you’ve recently opened in that app; click any to run it.
The bottom of the start menu has an extremely useful section called Recommended. It includes a list of apps you’ve recently installed and files you’ve recently opened. So rather than having to open an application like Word, and then browse for a file you’ve recently worked on, you can just click the file in Recommended, and it launches the application and opens the file in it. To see other files you’ve recently opened, click More for a longer, scrollable list.
You can right-click any file on either the Start menu or the scrollable list, and you’ll find some combination of these options:
Open in web browser: This is available only if you’re clicking an Office file stored in OneDrive. It will open the file in the web version of the appropriate Office app.
Open file location: Opens File Explorer to the folder where the file lives.
Remove from list: Removes the file from the Start menu and the scrollable list.
Windows Search is integrated directly into Start via a text box across the top of the screen. At first, it’s a bit confusing to use, because clicking the box doesn’t place a cursor in the text box and let you start searching. Instead, a search screen pops up — the same one you’ll see when you click the Search icon on the taskbar. It takes some getting used to. (You’ll find out more about Search in the next section of this article.)
You can also manage your user account from Start by clicking your account icon at the bottom left of the screen. Click and choose Change Account Settings. You’ll be able to change the photo associated with your account or take a new one, switch to a local account, and more. When you click your account icon, you can also lock your PC and sign out of Windows.
To put your PC to sleep, shut it down, or restart it, click the power button at the bottom right of the Start menu.
Using search
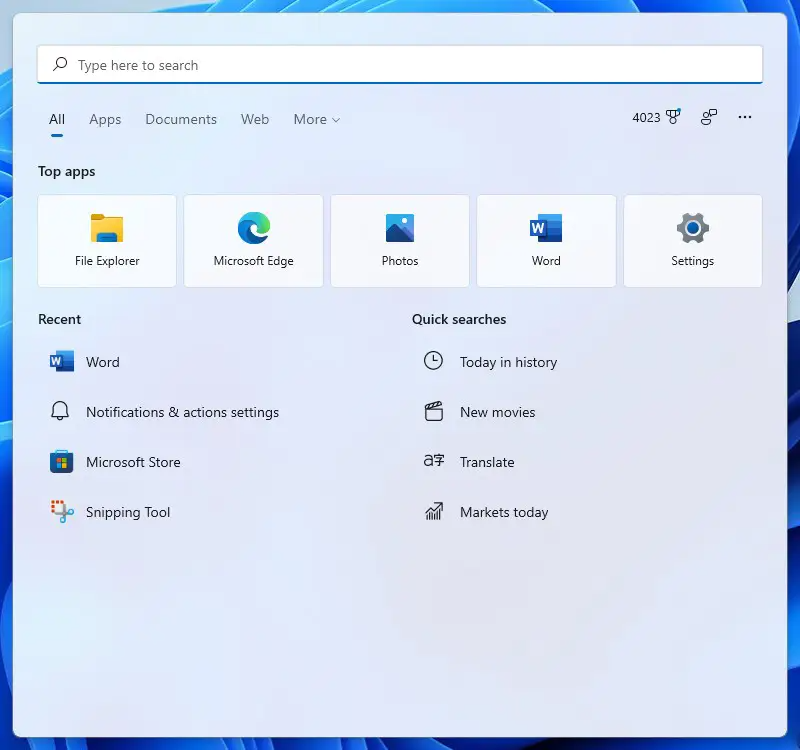
Windows 11 Search is much like Search in Windows 10, with a few minor tweaks here and there. To do a search, click the search button (a magnifying glass) on the taskbar. A rectangular pane pops up with a search box at the top.
When you first launch the Search box, it shows three areas below the tabs; these are somewhat confusing and only sometimes useful.
- Top apps is a row of icons of your commonly used applications and apps, such as Word, File Explorer, Settings, and others. Click any icon and you’ll be sent to the Search box or section of the app’s icon you clicked. You’ll then have to perform a search in that app in the usual way.
- Recent on the lower left has nothing to do with search — it’s supposed to be a list of apps you’ve recently used. Click any to launch it. But the label “Recent” isn’t always accurate. In my testing, it didn’t list the apps I had recently launched. Instead, it listed some that I rarely used.
- Quick searches lists generic searches that Microsoft believes you might want to run — “On my PC,” “Today in history,” “New movies,” “Translate,” and “Markets today.”
It’s much more useful to simply type your search term into the search box at the top of the pane. Windows Search uses the Bing search engine to look through your files, your Microsoft OneDrive cloud storage, your videos and music, the apps on your PC, your settings, your email, the web, and more. The “Top apps,” “Recent,” and “Quick searches” sections disappear, replaced by search results and related searches.
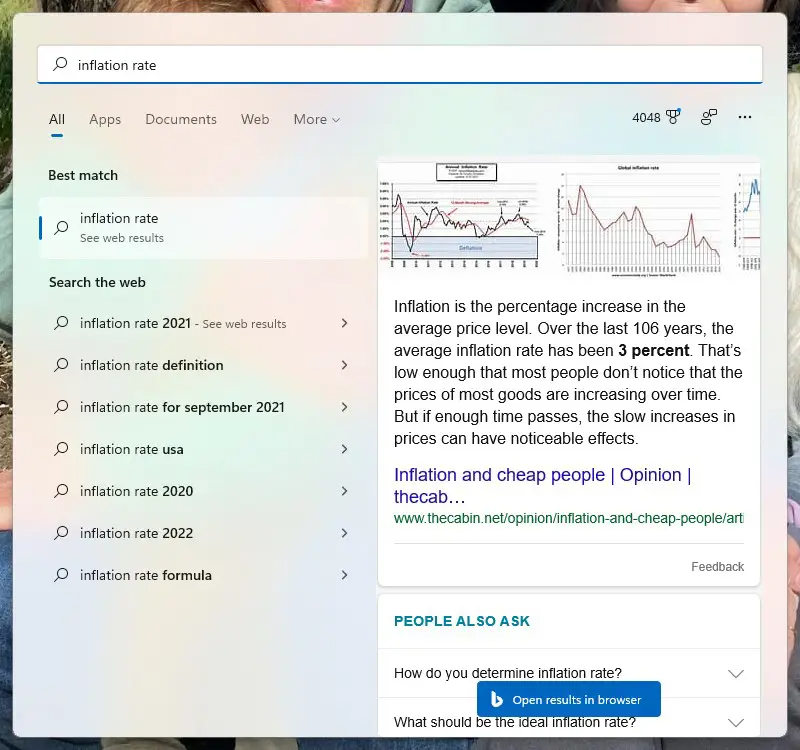
You can target your search by clicking any of the tabs just underneath the search box:
- All displays all search results.
- Apps shows any app-related matches.
- Documents shows documents on your PC that match the search.
- Web displays results from the web.
- More shows results from other places, including individual apps, emails, and folders including Music, People, Photos, Settings, and Videos. You’ll have to click the down arrow next to More to see them all.
One last note about search: By default, Windows Search only looks through a limited selection of default libraries and folders including OneDrive, Documents, Downloads, Music, Pictures, Videos, and Desktop. It won’t find files kept in other locations on your PC. However, you can change that. Go to Settings > Privacy & Security > Searching Windows, and in the “Find My Files” section, select Enhanced. That will tell Windows to search through your entire PC. If there are folders you want to exclude from the search, go to the “Excluded Folders” section, then click Add an excluded folder and browse to the folder you don’t want to search.
Widgets, widgets, widgets
Windows 10 has always offered widgets such as a news feed, weather, and more. You could run them individually, but they never had a home of their own.
In Windows 11, that’s changed. Click the Widgets icon on the taskbar (it’s a square divided vertically into two sections, one white and one blue), and a large panel appears on the left side of the screen showing a preselected set of them, including weather, news, sports, and others.
“>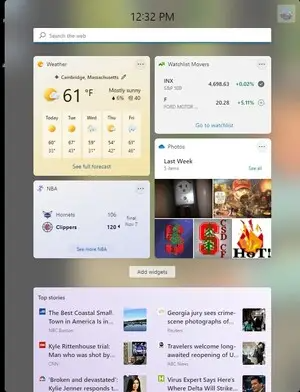
Each widget shows changing information, such as stock prices or the weather. Click one and you usually are sent out to the web for more details. You can change the size of each widget, remove it, and customize it by clicking the three-dot menu icon at its upper right. The menu typically offers some combination of these choices:
- Small, Medium, Large. Click the appropriate option to change the widget’s size.
- Customize widget. This leads to a screen that lets you change how the widget works. It’s generally different for each widget. For example, in the Sports widget, you can choose to get news about specific teams or specific leagues. And in the “Watchlist Movers” stock-tracking widget you can add new stocks to watch.
- Remove widget. This removes the widget from the pane.
To add a widget, click the “Add widgets” button, then browse through the widget categories and click the + button next to the widget(s) you want to add.
Teaming up with Teams
Windows 11 was finalized during the COVID pandemic, which changed the way we work and live, with videoconferencing and chat increasing as in-person meetings decreased. In Windows 11, Microsoft doubles down on the bet that chat and video meetings will remain an important part of people’s work and private life, even when life becomes more normal.
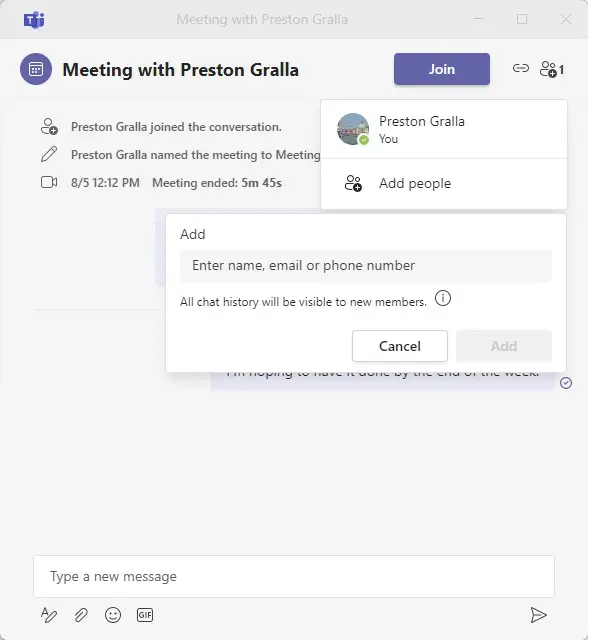
So it put a “Chat with Microsoft Teams” feature where you can’t miss it. You’ll see an icon for Teams, Microsoft’s chat, and videoconferencing software, just about dead center on the taskbar. Click the icon, and a Teams screen opens up with your contacts on them. (Note that the icon looks like a video camera until you click it. At that point, it turns into a conversation bubble icon.) Scroll and search through your contacts, click the person with whom you want to connect, and a Teams chat and videoconferencing window opens, requesting to connect. (You can also use the Windows key + C keyboard shortcut.)
At that point, you use Teams as you would normally. If your contact doesn’t use Teams, they will get an SMS message, and you can chat that way.
 IDG
IDG
Teams in Windows 11 makes it easy to chat and have video meetings, but it omits advanced business features. (Click image to enlarge it.)
You should be aware, though, that Teams in Windows 11 is for personal use only, not for business use. That means the full suite of enterprise Teams features, such as the use of channels, being able to search through message archives, and so on, isn’t available. That may change over time, but for now, it’s only for limited use.
Handling Windows 11 updates
Windows 11 is a boon for businesses and people who didn’t like Windows 10’s twice-yearly feature updates because of the potential for bugs being introduced with each new release. Windows 11 only gets feature updates once a year. Better yet, you can control whether and when to install each new feature update.
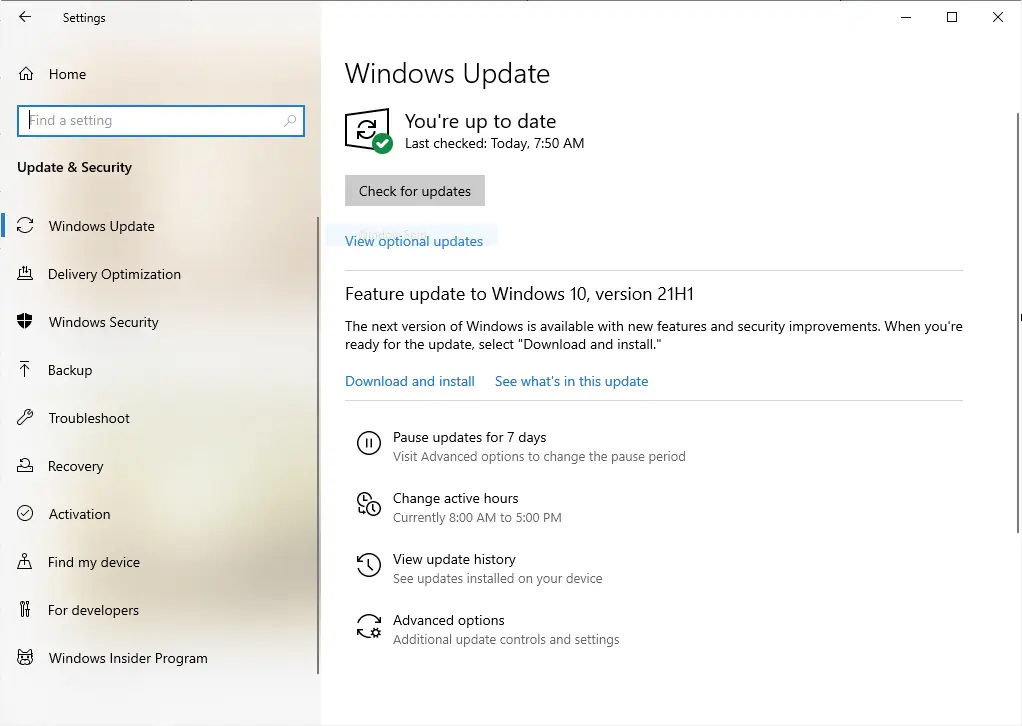
When Microsoft releases its annual Windows 11 feature update to the public, it isn’t automatically installed. Instead, Windows notifies you that it’s available with a message and a “Download and install” link in the Windows Update Settings pane. If you don’t want to install it, ignore the message and your PC stays as it is. Whenever you want to install an update, just click the link and follow the instructions.
There is one caveat. When your current version of Windows 11 reaches what Microsoft calls “end of service” — the point at which Microsoft no longer supports it — Windows 11 will install a more recent feature update automatically. For Windows 11 Home and Pro users, that’s usually 24 months after your current Windows version’s release. For Windows 11 Enterprise and Education users, that’s typically 36 months.
Even so, it’s theoretically possible to skip over some feature updates entirely. Since they’re released every year, you could install one version, decline to install the next one that’s released, and then install the one after that.
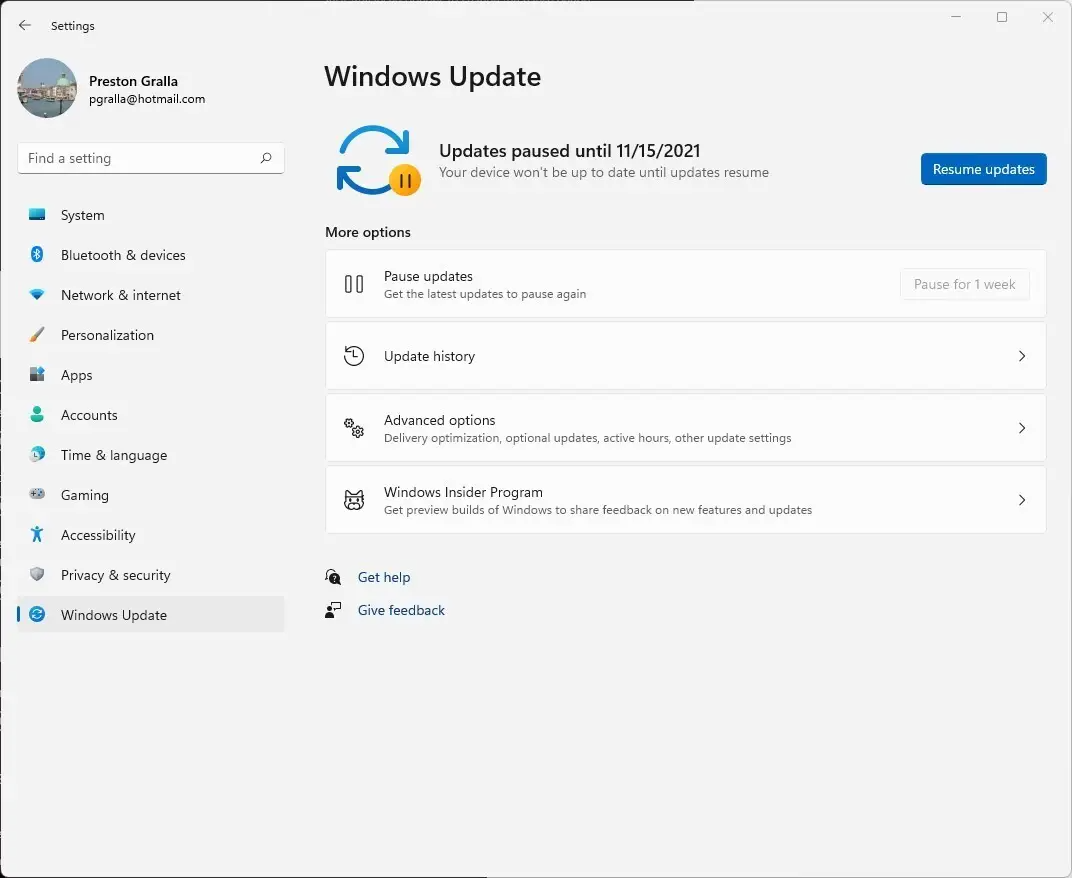
You have control not just over the annual Windows 11 feature updates, but also over the minor updates that Microsoft issues in between them. You can pause these smaller updates for up to 35 days.
To do it, go to Settings > Windows Update and next to “Pause updates,” click Pause for 1 week. You can keep doing this every seven days a total of five times to delay it for 35 days.
To do it, go to Settings > Windows Update > Update history > Uninstall updates. That brings you to the Control Panel and a list of updates. Select the update you want to uninstall and click Uninstall.
You can also ask Windows to alert you, via a system tray icon, when you need to reboot your PC in order to finish an update. Go to Settings > Windows Update > Advanced options, and next to “Notify me when a restart is required to finish update,” move the slider to On.

0 Comments